Qwen2.5大模型微调入门实战

知识点:什么是全参数微调?

大模型全参数微调是指对预训练大模型的所有参数进行更新和优化,区别于部分参数微调和LoRA微调

这种方法通过将整个模型权重(包括底层词嵌入、中间特征提取层和顶层任务适配层)在下游任务数据上进行梯度反向传播,使模型整体适应新任务的需求。相比仅微调部分参数,全参数微调能更充分地利用预训练模型的泛化能力,并针对特定任务进行深度适配,通常在数据差异较大或任务复杂度较高的场景下表现更优。

img

不过,全参数微调往往需要更高的计算资源和存储开销,且存在**过拟合风险**(尤其在小数据集上)。实际应用中常结合学习率调整、参数分组优化或正则化技术来缓解这些问题。

全参数微调多用于对模型表现性能要求较高的场景,例如专业领域知识问答或高精度文本生成。

1. 环境安装

本案例基于Python>=3.8,请在您的计算机上安装好Python;

另外,您的计算机上至少要有一张英伟达/昇腾显卡(显存要求大概32GB左右可以跑)。

我们需要安装以下这几个Python库,在这之前,请确保你的环境内已安装了pytorch以及CUDA:

1
2
3
4
5
6
7
swanlab
modelscope==1.22.0
transformers>=4.46.0
datasets==3.2.0
accelerate
pandas
addict

2. 准备数据集 dataset.py

本案例使用的是 delicate_medical_r1_data 数据集,该数据集主要被用于医学对话模型。

该数据集由2000多条数据组成,每条数据包含Instruction、question、think、answer、metrics五列:

img

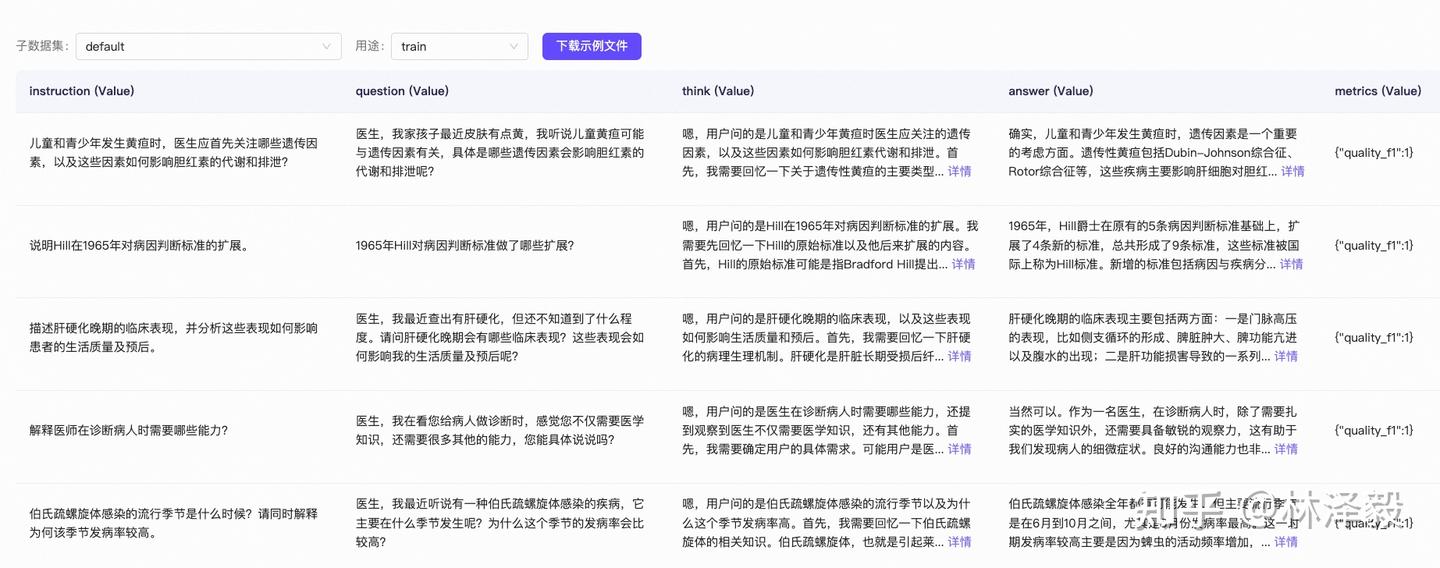
这里我们只取question、think、answer这三列:

  • question:用户提出的问题,即模型的输入
  • think:模型的思考过程。大家如果用过DeepSeek R1的话,回复中最开始的思考过程就是这个。
  • answer:模型思考完成后,回复的内容。

我们的训练任务,便是希望微调后的大模型,能够根据question,给用户一个think+answer的组合回复,并且thinkanswer在网页上的展示有区分。

理清需求后,我们设计这样一个数据集样例:

1
2
3
4
5
{
"question": "我父亲刚刚被诊断为活动性出血,医生说需要立即处理,我们该怎么做?",
"think": "嗯,用户的问题是关于病人出现活动性出血时应采取哪些一般处理措施,...",
"answer": "首先,您父亲需要卧床休息,活动性出血期间暂时不要进食。为了...",
}

在训练代码执行时,会将thinkanswer按下面这样的格式组合成一条完整回复:

1
2
3
4
5
<think>
嗯,用户的问题是关于病人出现活动性出血时应采取哪些一般处理措施,...
</think>

首先,您父亲需要卧床休息,活动性出血期间暂时不要进食。为了...

接下来我们来下载数据集,并进行必要的格式转换。

这个流程非常简单,执行下面的代码即可:

1
2
3
4
5
6
7
8
9
10
11
12
13
14
15
16
17
18
19
20
21
22
23
24
25
26
27
28
from modelscope.msdatasets import MsDataset
import json
import random

random.seed(42)

ds = MsDataset.load('krisfu/delicate_medical_r1_data', subset_name='default', split='train')
data_list = list(ds)
random.shuffle(data_list)

split_idx = int(len(data_list) * 0.9)

train_data = data_list[:split_idx]
val_data = data_list[split_idx:]

with open('train.jsonl', 'w', encoding='utf-8') as f:
for item in train_data:
json.dump(item, f, ensure_ascii=False)
f.write('\n')

with open('val.jsonl', 'w', encoding='utf-8') as f:
for item in val_data:
json.dump(item, f, ensure_ascii=False)
f.write('\n')

print(f"The dataset has been split successfully.")
print(f"Train Set Size:{len(train_data)}")
print(f"Val Set Size:{len(val_data)}")

3. 模型下载 model.py

代码如下:

1
2
3
4
5
6
7
8
9
10
from modelscope import snapshot_download
import torch
from transformers import AutoModelForCausalLM, TrainingArguments, Trainer, DataCollatorForSeq2Seq, AutoTokenizer

# 在modelscope上下载Qwen模型到本地目录下
model_dir = snapshot_download("Qwen/Qwen2.5-1.5B", cache_dir="./", revision="master")

# Transformers加载模型权重
tokenizer = AutoTokenizer.from_pretrained("./Qwen/Qwen2.5-1.5B", use_fast=False, trust_remote_code=True)
model = AutoModelForCausalLM.from_pretrained("./Qwen/Qwen2.5-1.5B", device_map="auto", torch_dtype=torch.bfloat16)

4. 全量微调 train.py

1
2
3
4
5
6
7
8
9
10
11
12
13
14
15
16
17
18
19
20
21
22
23
24
25
26
27
28
29
30
31
32
33
34
35
36
37
38
39
40
41
42
43
44
45
46
47
48
49
50
51
52
53
54
55
56
57
58
59
60
61
62
63
64
65
66
67
68
69
70
71
72
73
74
75
76
77
78
79
80
81
82
83
84
85
86
87
88
89
90
91
92
93
94
95
96
97
98
99
100
101
102
103
104
105
106
107
108
109
110
111
112
113
114
115
116
117
118
119
120
121
122
123
124
125
126
127
128
129
130
131
132
133
134
135
136
137
138
139
140
141
142
143
144
145
146
147
148
149
150
151
152
153
154
155
156
157
158
159
160
161
162
163
164
165
166
167
168
169
170
171
172
173
174
import json
import pandas as pd
import torch
from datasets import Dataset
from modelscope import snapshot_download, AutoTokenizer
from transformers import AutoModelForCausalLM, TrainingArguments, Trainer, DataCollatorForSeq2Seq
import os
# import swanlab


os.environ["WANDB_MODE"] = "offline" # 强制离线模式
os.environ["WANDB_API_KEY"] = "xxxxxxxx" # 可选,若已有密钥
PROMPT = "你是一个医学专家,你需要根据用户的问题,给出带有思考的回答。"
MAX_LENGTH = 2048

# swanlab.config.update({
# "model": "Qwen/Qwen2.5-1.5B",
# "prompt": PROMPT,
# "data_max_length": MAX_LENGTH,
# })

def dataset_jsonl_transfer(origin_path, new_path):
"""
将原始数据集转换为大模型微调所需数据格式的新数据集
"""
messages = []

# 读取旧的JSONL文件
with open(origin_path, "r") as file:
for line in file:
# 解析每一行的json数据
data = json.loads(line)
input = data["question"]
output = f"<think>{data['think']}</think> \n {data['answer']}"
message = {
"instruction": PROMPT,
"input": f"{input}",
"output": output,
}
messages.append(message)

# 保存重构后的JSONL文件
with open(new_path, "w", encoding="utf-8") as file:
for message in messages:
file.write(json.dumps(message, ensure_ascii=False) + "\n")

def process_func(example):
"""
将数据集进行预处理
"""
input_ids, attention_mask, labels = [], [], []
instruction = tokenizer(
f"<|im_start|>system\n{PROMPT}<|im_end|>\n<|im_start|>user\n{example['input']}<|im_end|>\n<|im_start|>assistant\n",
add_special_tokens=False,
)
response = tokenizer(f"{example['output']}", add_special_tokens=False)
input_ids = instruction["input_ids"] + response["input_ids"] + [tokenizer.pad_token_id]
attention_mask = (
instruction["attention_mask"] + response["attention_mask"] + [1]
)
labels = [-100] * len(instruction["input_ids"]) + response["input_ids"] + [tokenizer.pad_token_id]
if len(input_ids) > MAX_LENGTH: # 做一个截断
input_ids = input_ids[:MAX_LENGTH]
attention_mask = attention_mask[:MAX_LENGTH]
labels = labels[:MAX_LENGTH]
return {"input_ids": input_ids, "attention_mask": attention_mask, "labels": labels}

def predict(messages, model, tokenizer):
device = "cuda"
text = tokenizer.apply_chat_template(
messages,
tokenize=False,
add_generation_prompt=True
)
model_inputs = tokenizer([text], return_tensors="pt").to(device)

generated_ids = model.generate(
model_inputs.input_ids,
max_new_tokens=MAX_LENGTH,
)
generated_ids = [
output_ids[len(input_ids):] for input_ids, output_ids in zip(model_inputs.input_ids, generated_ids)
]

response = tokenizer.batch_decode(generated_ids, skip_special_tokens=True)[0]

return response

# 在modelscope上下载Qwen模型到本地目录下
model_dir = snapshot_download("Qwen/Qwen2.5-1.5B", cache_dir="/home/lzrj/pythonproject/sft/", revision="master")

# Transformers加载模型权重
tokenizer = AutoTokenizer.from_pretrained("/home/lzrj/pythonproject/sft/Qwen/Qwen2.5-1.5B", use_fast=False, trust_remote_code=True)
model = AutoModelForCausalLM.from_pretrained("/home/lzrj/pythonproject/sft/Qwen/Qwen2.5-1.5B", device_map="auto", torch_dtype=torch.bfloat16)
model.enable_input_require_grads() # 开启梯度检查点时,要执行该方法

# 加载、处理数据集和测试集
train_dataset_path = "train.jsonl"
test_dataset_path = "val.jsonl"

train_jsonl_new_path = "train_format.jsonl"
test_jsonl_new_path = "val_format.jsonl"

if not os.path.exists(train_jsonl_new_path):
dataset_jsonl_transfer(train_dataset_path, train_jsonl_new_path)
if not os.path.exists(test_jsonl_new_path):
dataset_jsonl_transfer(test_dataset_path, test_jsonl_new_path)

# 得到训练集
train_df = pd.read_json(train_jsonl_new_path, lines=True)
train_ds = Dataset.from_pandas(train_df)
train_dataset = train_ds.map(process_func, remove_columns=train_ds.column_names)

# 得到验证集
eval_df = pd.read_json(test_jsonl_new_path, lines=True)
eval_ds = Dataset.from_pandas(eval_df)
eval_dataset = eval_ds.map(process_func, remove_columns=eval_ds.column_names)

args = TrainingArguments(
output_dir="/home/lzrj/pythonproject/sft/output/Qwen2.5-1.5B",
per_device_train_batch_size=1,
per_device_eval_batch_size=1,
gradient_accumulation_steps=4,
eval_strategy="steps",
eval_steps=100,
logging_steps=10,
num_train_epochs=2,
save_steps=400,
learning_rate=1e-4,
save_on_each_node=True,
gradient_checkpointing=True,
# report_to="swanlab",
run_name="qwen2.5-1.5B",
)

trainer = Trainer(
model=model,
args=args,
train_dataset=train_dataset,
eval_dataset=eval_dataset,
data_collator=DataCollatorForSeq2Seq(tokenizer=tokenizer, padding=True), # 在batch内自动填充
)

trainer.train()

# 用测试集的前3条,主观看模型
test_df = pd.read_json(test_jsonl_new_path, lines=True)[:3]

test_text_list = []

for index, row in test_df.iterrows():
instruction = row['instruction']
input_value = row['input']

messages = [
{"role": "system", "content": f"{instruction}"},
{"role": "user", "content": f"{input_value}"}
]

response = predict(messages, model, tokenizer)

response_text = f"""
Question: {input_value}

LLM:{response}
"""

# test_text_list.append(swanlab.Text(response_text))
test_text_list.append(response_text)
print(response_text)

print({"Prediction": test_text_list})

# swanlab.finish()

注意这里的:

1
2
3
4
5
6
7
8
9
10
11
12
13
14
15
16
17
18
19
20
def process_func(example):
"""
将数据集进行预处理
"""
input_ids, attention_mask, labels = [], [], []
instruction = tokenizer(
f"<|im_start|>system\n{PROMPT}<|im_end|>\n<|im_start|>user\n{example['input']}<|im_end|>\n<|im_start|>assistant\n",
add_special_tokens=False,
)
response = tokenizer(f"{example['output']}", add_special_tokens=False)
input_ids = instruction["input_ids"] + response["input_ids"] + [tokenizer.pad_token_id]
attention_mask = (
instruction["attention_mask"] + response["attention_mask"] + [1]
)
labels = [-100] * len(instruction["input_ids"]) + response["input_ids"] + [tokenizer.pad_token_id]
if len(input_ids) > MAX_LENGTH: # 做一个截断
input_ids = input_ids[:MAX_LENGTH]
attention_mask = attention_mask[:MAX_LENGTH]
labels = labels[:MAX_LENGTH]
return {"input_ids": input_ids, "attention_mask": attention_mask, "labels": labels}

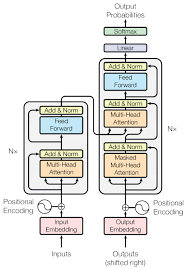
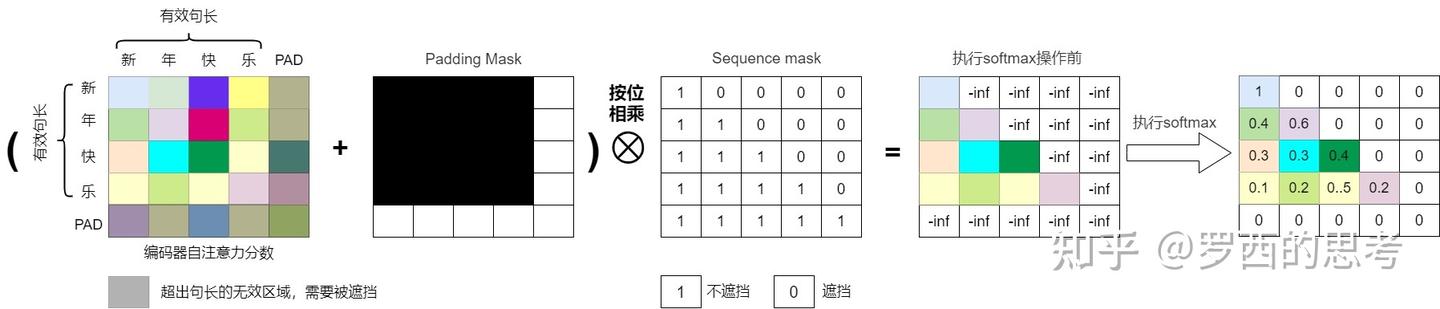
机器学习领域中,掩码(Mask)本质是一个跟需要掩盖的目标张量大小一致的(大多数是0-1二值)张量,其思想最早起源于 word2vec 的CBOW的训练机制:通过上下文来预测中心词。掩码就相当于把中心词给遮掩住。不同的任务和应用场景可能需要不同类型的mask操作。在自注意力模型中,常见的mask操作有两种:Padding mask和Sequence mask。

  • Padding mask(填充掩码):在处理变长序列时,为了保持序列的长度一致,通常会在序列的末尾添加一些特殊的填充符号(如)。Padding mask的作用是将这些填充符号对应位置的注意力分数设为一个很小的值(如负无穷),从而使模型在计算注意力分数时忽略这些填充符号,避免填充符号对计算产生干扰。
  • Sequence mask(序列掩码):在某些任务中,为了避免模型在生成序列时看到未来的信息,需要对注意力分数进行掩码操作。Sequence mask的作用是通过构建下三角(或者上三角)的注意力分数矩阵,将当前位置之后位置的注意力分数设为一个很小的值,从而使模型只关注当前 token 与之前 token 的注意力关系,不理会它与后续 token 的关系。这样可以保证模型在生成序列时只依赖于已经生成的部分,不会受到未来信息的影响,即只”看”当前及前面的 tokens。也有把Sequence mask叫做Casual Mask的。

使用掩码的自注意力机制就叫做掩码自注意力机制,也被称为因果自注意力(Causal Self-Attention)。

img

掩码:https://zhuanlan.zhihu.com/p/28786272137

我们在训练的时候,解码器不应该提前知道下文的信息,不能计算当前词和后面的词的注意力,而只能计算当前词和前面所有词的注意力。

所以针对上面的代码:

根据您提供的代码和之前的技术报告内容,我们可以分析这段数据预处理代码的原理和潜在改进点:

代码原理分析

这段代码 process_func 的主要目的是将原始的问答对(example['input']example['output'])转换成适合语言模型进行指令微调(Supervised Fine-tuning, SFT)的格式。其工作原理如下:

  1. 构建指令部分 (Instruction):

    • 它使用一个预定义的 PROMPT(通常是一个系统角色设定,如 “You are a helpful assistant.”)和用户的实际输入 (example['input'])。
    • 按照 Qwen 模型期望的聊天模板格式进行拼接:<|im_start|>system\n{PROMPT}<|im_end|>\n<|im_start|>user\n{用户输入}<|im_end|>\n<|im_start|>assistant\n
    • 使用 tokenizer 对这个完整的指令字符串进行编码,得到 instruction["input_ids"]instruction["attention_mask"]add_special_tokens=False 是为了精确控制特殊标记的添加。
  2. 构建响应部分 (Response):

    • 使用 tokenizer 对模型期望的输出 (example['output']) 进行编码,得到 response["input_ids"]response["attention_mask"]]。
  3. 拼接完整序列:

    • 将指令的 input_ids、响应的 input_ids 以及一个 pad_token_id(用于标记序列结束或填充)连接起来,形成最终的 input_ids
    • 同样地,将指令和响应的 attention_mask 连接,并在末尾添加 1(表示 pad_token 也是实际内容的一部分,应被注意)。
  4. 构建标签 (Labels):

    • 这是关键部分,用于训练时计算损失。
    • 对于指令部分 (len(instruction["input_ids"]) 个标记),标签设置为 -100。这是 PyTorch 中交叉熵损失函数的一个特殊值,表示在计算损失时忽略这些位置。这样模型就不会因为预测用户输入或系统提示的内容而受到惩罚,只关注学习如何生成正确的响应。
    • 对于响应部分,标签设置为对应的 response["input_ids"],即模型应该预测出的内容。
    • 最后一个 pad_token_id 的标签也被设置为 pad_token_id(虽然有时也可能设为 -100,取决于具体实现,但这里代码是这样写的)。
  5. 截断 (Truncation):

    • 如果拼接后的总长度超过了预设的最大长度 MAX_LENGTH,则对 input_idsattention_masklabels 进行截断,只保留前 MAX_LENGTH 个元素。

潜在改进点

虽然这段代码基本实现了所需功能,但结合 Qwen3 技术报告中的信息和常见的实践,可以考虑以下改进:

  1. 结束标记的处理:

    • 问题: 当前代码在响应末尾添加了 pad_token_id。然而,对于生成任务,通常使用特定的结束标记(如 <|im_end|>eos_token)来表示生成的结束。如果模型训练时没有明确学习到这个结束标记,可能会影响生成时的停止行为。
    • 改进: 考虑在响应末尾添加模型的 eos_token_id,并在标签中也相应包含它(如果希望模型学习预测它),或者明确地将其标签设为 -100(如果只用它做信号,不计算损失)。
    • 示例修改 (假设使用 eos_token):
      1
      2
      3
      4
      5
      6
      7
      8
      9
      10
      11
      12
      # response = tokenizer(f"{example['output']}", add_special_tokens=False) # 原始
      response = tokenizer(f"{example['output']}{tokenizer.eos_token}", add_special_tokens=False) # 改进:在输出后添加 eos_token

      # input_ids = instruction["input_ids"] + response["input_ids"] + [tokenizer.pad_token_id] # 原始
      input_ids = instruction["input_ids"] + response["input_ids"] # 改进:input_ids 包含 eos_token

      # attention_mask = instruction["attention_mask"] + response["attention_mask"] + [1] # 原始
      attention_mask = instruction["attention_mask"] + response["attention_mask"] # 改进:attention_mask 包含 eos_token 位置

      # labels = [-100] * len(instruction["input_ids"]) + response["input_ids"] + [tokenizer.pad_token_id] # 原始
      labels = [-100] * len(instruction["input_ids"]) + response["input_ids"] # 改进:标签包含 eos_token_id,让模型学习预测结束
      # 或者 labels = [-100] * len(instruction["input_ids"]) + response["input_ids"][:-1] + [-100] # 如果不想计算 eos_token 的损失
  2. 填充 (Padding) 的处理:

    • 问题: 这段代码似乎没有显式地进行填充(Padding)。如果批次中的样本长度不同,后续的批处理(batching)步骤需要进行填充。如果不在这里处理,需要确保数据加载器(DataLoader)的 collate_fn 能正确处理长度不一的序列。
    • 改进: 可以选择在这里进行填充到 MAX_LENGTH,或者保持现状,依赖 DataLoader 处理(这里使用了DataCollatorForSeq2Seq来填充,会在每个 batch 内将所有样本 动态填充到该 batch 中最长样本的长度。所以在训练过程中,每个 batch 的输入都会被 pad 成一样长(仅在该 batch 内),而不是整个数据集都 pad 到 MAX_LENGTH。)。
  3. 思考模式 (Thinking Mode) 的潜在支持:

    • 问题: Qwen3 技术报告提到了思考模式 (<think>...</think>) 和非思考模式,并且模型能够在这两种模式间切换。当前的代码只处理了标准的对话格式。
    • 改进: 如果需要训练模型在特定情况下进入思考模式,可能需要根据 example 中的额外信息(例如,是否需要深度推理)来决定是否在提示中加入 /think 标记,或者在响应中包含 <think>...</think> 结构。这会使数据预处理更复杂,但能更好地利用 Qwen3 的特性。
    • 示例思路 (假设 examplerequires_thinking 字段):
      1
      2
      3
      4
      5
      6
      7
      8
      9
      10
      11
      12
      # ... inside process_func ...
      if example.get('requires_thinking', False):
      # 构造包含 /think 的提示
      instruction_text = f"<|im_start|>system\n{PROMPT}<|im_end|>\n<|im_start|>user\n{example['input']}/think<|im_end|>\n<|im_start|>assistant\n<think>"
      # 响应格式可能也需要调整,包含 <think>content</think> 结构
      # ...
      else:
      # 标准提示格式
      instruction_text = f"<|im_start|>system\n{PROMPT}<|im_end|>\n<|im_start|>user\n{example['input']}<|im_end|>\n<|im_start|>assistant\n"
      # ...
      instruction = tokenizer(instruction_text, add_special_tokens=False)
      # ... rest of processing ...
  4. 效率和健壮性:

    • 问题: tokenizer 调用两次。对于非常大的数据集,这可能不是最高效的。另外,没有对 example 的键(‘input’, ‘output’)是否存在进行检查。
    • 改进: 可以考虑使用 tokenizer.apply_chat_template(如果 tokenizer 支持且配置了合适的模板)来一次性处理整个对话历史,这可能更高效且不易出错。增加对 example 数据完整性的检查。

总结:

这段代码是 SFT 数据预处理的标准做法,核心是构建输入序列和对应的标签。主要的改进点在于更精确地处理序列结束标记(eos_token)以及根据模型(如 Qwen3)的特殊功能(思考模式)调整输入格式。
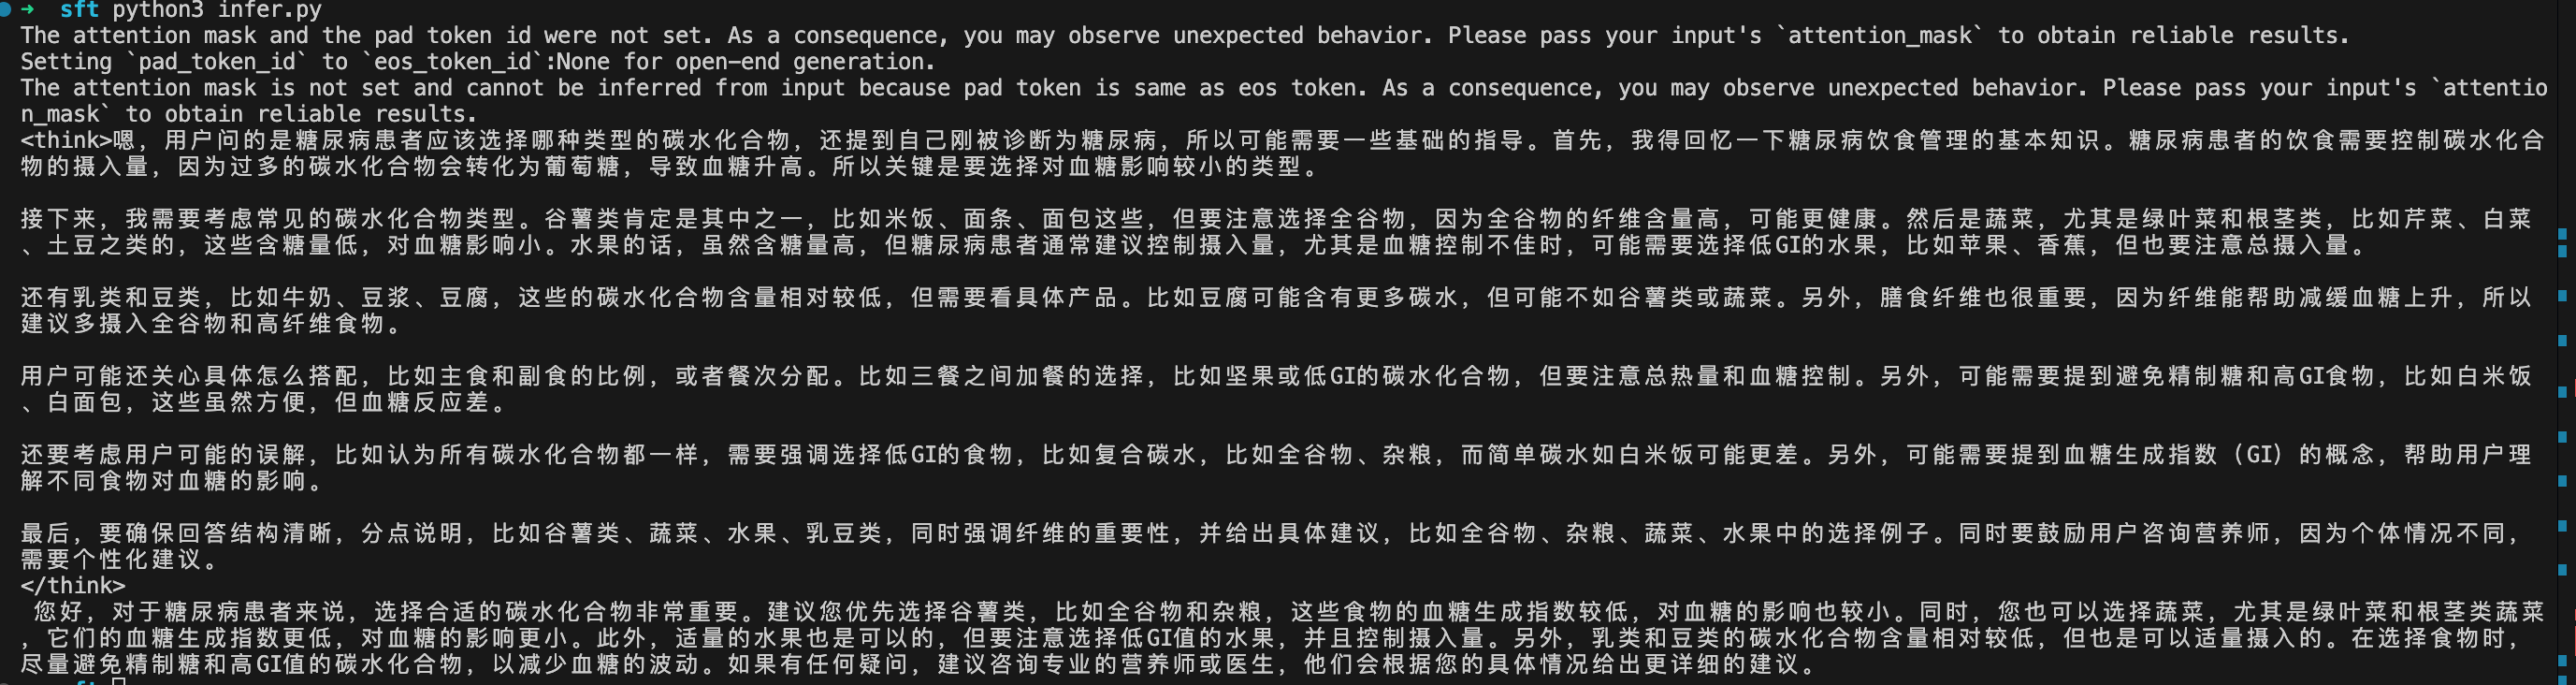
5. 推理 infer.py

1
2
3
4
5
6
7
8
9
10
11
12
13
14
15
16
17
18
19
20
21
22
23
24
25
26
27
28
29
30
31
32
33
34
import torch
from transformers import AutoModelForCausalLM, AutoTokenizer

def predict(messages, model, tokenizer):
device = "cuda"

text = tokenizer.apply_chat_template(messages, tokenize=False, add_generation_prompt=True)
model_inputs = tokenizer([text], return_tensors="pt").to(device)

generated_ids = model.generate(model_inputs.input_ids, max_new_tokens=2048)
generated_ids = [output_ids[len(input_ids):] for input_ids, output_ids in zip(model_inputs.input_ids, generated_ids)]
response = tokenizer.batch_decode(generated_ids, skip_special_tokens=True)[0]

return response

# 加载原下载路径的tokenizer和model
tokenizer = AutoTokenizer.from_pretrained("./output/Qwen2.5-1.5B/checkpoint-1082", use_fast=False, trust_remote_code=True)
model = AutoModelForCausalLM.from_pretrained("./output/Qwen2.5-1.5B/checkpoint-1082", device_map="auto", torch_dtype=torch.bfloat16)

test_texts = {
'instruction': "你是一个医学专家,你需要根据用户的问题,给出带有思考的回答。",
'input': "医生,我最近被诊断为糖尿病,听说碳水化合物的选择很重要,我应该选择什么样的碳水化合物呢?"
}

instruction = test_texts['instruction']
input_value = test_texts['input']

messages = [
{"role": "system", "content": f"{instruction}"},
{"role": "user", "content": f"{input_value}"}
]

response = predict(messages, model, tokenizer)
print(response)

效果

image.png