Java线程、多线程与线程池总结
Java线程、多线程与线程池总结
Java创建线程的三种方法
-
继承Thread类创建线程类 (extends)
-
定义Thread类的子类,并重写该类的run方法,该run方法的方法体就代表了线程要完成的任务。因此把run()方法称为执行体(线程体)。
-
创建Thread子类的实例,即创建了线程对象。
-
调用线程对象的start()方法来启动该线程。
1
2
3
4
5
6
7
8
9
10
11
12
13
14
15
public class CreateThreadByExtendThread extends Thread{
int i = 0;
public void run(){
for (;i<100;i++){
System.out.println(Thread.currentThread().getName()+":"+i); //获取本线程的名称
}
}
public static void main(String[]args){
CreateThreadByExtendThread c1 = new CreateThreadByExtendThread();
CreateThreadByExtendThread c2 = new CreateThreadByExtendThread();
c1.start();
c2.start();
}
}
-
-
通过Runnable接口创建线程类
-
定义runnable接口的实现类,并重写该接口的run()方法,该run()方法的方法体同样是该线程的线程执行体。
-
创建 Runnable实现类的实例,并以此实例作为Thread的target来创建Thread对象,该Thread对象才是真正的线程对象。
-
调用线程对象的start()方法来启动该线程。
1
2
3
4
5
6
7
8
9
10
11
12
13
14
15
16
17
18
public class CreateThreadByImplementRunnable implements Runnable{
int i=0;
public void run(){
while(i<100){
System.out.println(Thread.currentThread().getName()+":"+i++);
}
}
public static void main(String[] args){
CreateThreadByImplementRunnable createThreadByImplementRunnable1=new CreateThreadByImplementRunnable();
CreateThreadByImplementRunnable createThreadByImplementRunnable2=new CreateThreadByImplementRunnable();
Thread thread1= new Thread(createThreadByImplementRunnable1,"Thread-1");
Thread thread2= new Thread(createThreadByImplementRunnable2,"Thread-2");
thread1.start();
thread2.start();
}
}
-
-
通过Callable和Future创建线程
callable->callable实现类->FutureTask<>(callable实现类实例)->Thread(futuretask实例)
-
创建Callable接口的实现类,并实现call()方法,该call()方法将作为线程执行体,并且有返回值。
-
创建Callable实现类的实例,使用FutureTask类来包装Callable对象,该FutureTask对象封装了该Callable对象的call()方
法的返回值。(FutureTask是一个包装器,它通过接受Callable来创建,它同时实现了Future和Runnable接口)
-
使用FutureTask对象作为Thread对象的target创建并启动新线程。
-
调用FutureTask对象的get()方法来获得子线程执行结束后的返回值
1
2
3
4
5
6
7
8
9
10
11
12
13
14
15
16
17
18
19
20
21
22
23
import java.util.concurrent.Callable;
import java.util.concurrent.FutureTask;
public class CreateThreadByImplementCallable implements Callable {
public Integer call()throws Exception{
int i = 0;
for(;i<100;i++){
System.out.println(Thread.currentThread().getName()+" "+i);
Thread.sleep(100); // 休眠100ms
}
return i;
}
public static void main(String[]args){
for (int i = 0;i<20;i++){
CreateThreadByImplementCallable ct = new CreateThreadByImplementCallable();
FutureTask<Integer> ft = new FutureTask<>(ct);
Thread t = new Thread(ft);
t.start();
}
}
}
-
Java创建线程池的五种方法
继承的ExecutorService接口
-
newCachedThreadPool(没有上限的线程池),如果线程池长度超过处理需要,可灵活回收空闲线程,若无可回收,则新建线程。
1
2
3
4
5
6
ExecutorService cachedThreadPool = Executors.newCachedThreadPool();
cachedThreadPool.execute(new Runnable(){
public void run() {
System.out.println("执行线程任务");
}) -
newFixdedThreadPool(有上限的线程池),创建一个定长线程池,可控制线程最大并发数,超出的线程会在队列中等待。
1
2
3
4
5
6
ExecutorService fixedThreadPool = Executors.newFixedThreadPool(3);
fixedThreadPool.execute(new Runnable(){
public void run() {
System.out.println("执行线程任务");
}) -
newScheduledThreadPool,创建一个定长线程池,支持定时及周期性任务执行。延迟执行示例代码如下:
1
2
3
4
5
6
7
ScheduledExecutorService scheduledThreadPool = Executors.newScheduledThreadPool(5);
scheduledThreadPool.schedule(new Runnable() {
public void run() {
System.out.println("delay 3 seconds");
}
}, 3, TimeUnit.SECONDS);//延迟三秒执行 -
newSingleThreadExecutor,创建一个单线程化的线程池,它只会用唯一的工作线程来执行任务,保证所有任务按照指定顺序(FIFO, LIFO, 优先级)执行。
1
2
3
4
5
6
ExecutorService executorService = Executors.newSingleThreadExecutor();
executorService.execute(new Runnable(){
public void run() {
System.out.println("执行线程任务");
}) -
ThreadPoolExecutor(自定义创建线程池)
-
它最长的构造方法有七个参数。
- 核心线程数量——在线程池当中无论空闲多久都不会被删除的线程
- 线程池当中最大的线程数量——线程池当中最大能创建的线程数量
- 空闲时间(数值)——临时线程(线程池中出核心线程之外的线程)空闲了多久就会被淘汰的时间。
- 空闲时间(单位)——临时线程空闲了多久就会被淘汰的时间单位,要用枚举类TimeUnit类作为参数
- 阻塞队列——就是创建一个阻塞队列作为参数传入,就是当线程池当中线程数量已经达到了最大线程数量,允许多少个任务排队获取线程,其余的用参数七那个方案来处理。
- 创建线程的方式——不是new一个线程,而是传入一个线程工厂(例如:Executors工具类中的defaultThreadFactory方法返回的就是一个线程工厂)
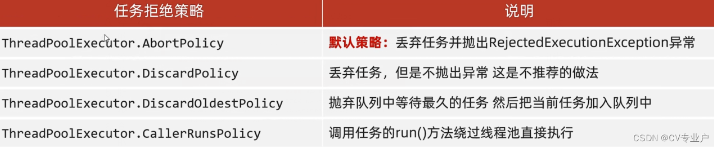
- 要执行的任务过多时的解决方案——当等待队列中也排满时要怎么处理这些任务(任务拒绝策略)
1
2
3
4
5
6
7
8
9
10
11
12
13
14
15
16
17
18
19
20
21
//代码实现
/**
* 之前用工具类进行创建,有好多参数不能自己设置
* 咱直接自己手动创建一个线程池,自己设置参数
* 参数一:核心线程数量 不能小于0
* 参数二:最大线程数 不能小于0,数值大于等于核心线程数量
* 参数三:空闲临时线程最大存活时间(数值) 不能小于0
* 参数四:空闲临时线程最大存活时间(单位) 用TimeUnit这个枚举类表示
* 参数五:任务队列,也就是一个堵塞队列 不能为null
* 参数六:创建线程的工厂 不能为null
* 参数七:任务的拒绝策略 不能为null
*/
ThreadPoolExecutor threadPoolExecutor = new ThreadPoolExecutor(
3, // 核心线程数量
6, //最大线程数
60, //空闲临时线程最大存活时间(数值)
TimeUnit.SECONDS,//空闲临时线程最大存活时间(单位)
new ArrayBlockingQueue<>(3),//任务队列,也就是一个堵塞队列,也可以使用LinkedBlockingQueue这个阻塞队列
Executors.defaultThreadFactory(),//用线程池工具类Executors创建线程的工厂
new ThreadPoolExecutor.AbortPolicy()//任务的拒绝策略中其中一个,丢弃任务并抛出RejectedExecutionException
}
-
ExecutorService的submit和execute的区别
在 Java 中,ExecutorService 接口是用于管理和执行线程的框架,它定义了两个用于提交任务的方法:submit() 和 execute()。这两种方法有一些区别:
-
返回值:
- submit() 方法接受 Callable(因为实现Callable的call也有返回值嘛,而且还要抛出异常) 或 Runnable 任务,并返回一个 Future 对象,可以用于获取任务的执行结果或取消任务的执行。
- execute() 方法接受 Runnable 任务,但它没有返回值,因此无法获取任务的执行结果。
-
异常处理:
- submit() 方法可以捕获任务执行过程中抛出的异常,并通过 Future 对象的 get() 方法抛出,从而实现对异常的处理。
- execute() 方法无法捕获任务执行过程中的异常,因为它没有返回值。
1 | import java.util.concurrent.ExecutorService; |